Custom Actions
Create personalized AI workflows tailored to your needs. Define custom prompts, choose icons, and run them on any screen content from the floating sidebar.
Browse all features (13)
Custom Actions let you build AI workflows that match your exact needs. You define the prompt (what you want the AI to do), pick an icon so you can spot it quickly, and optionally turn on screenshot capture or web search. Your actions show up in the floating sidebar so you can run them on any screen content with one tap.
Key Capabilities
- Create unlimited custom AI actions
- Up to 40,000 characters per prompt for detailed instructions
- Choose from 100+ icons organized by category
- Optional screenshot capture with region selection
- Drag-to-reorder actions in the sidebar
- Enable or disable actions without deleting them
- Search to find actions quickly
- Publish actions to the community for others to use
How to Use
Creating a Custom Action
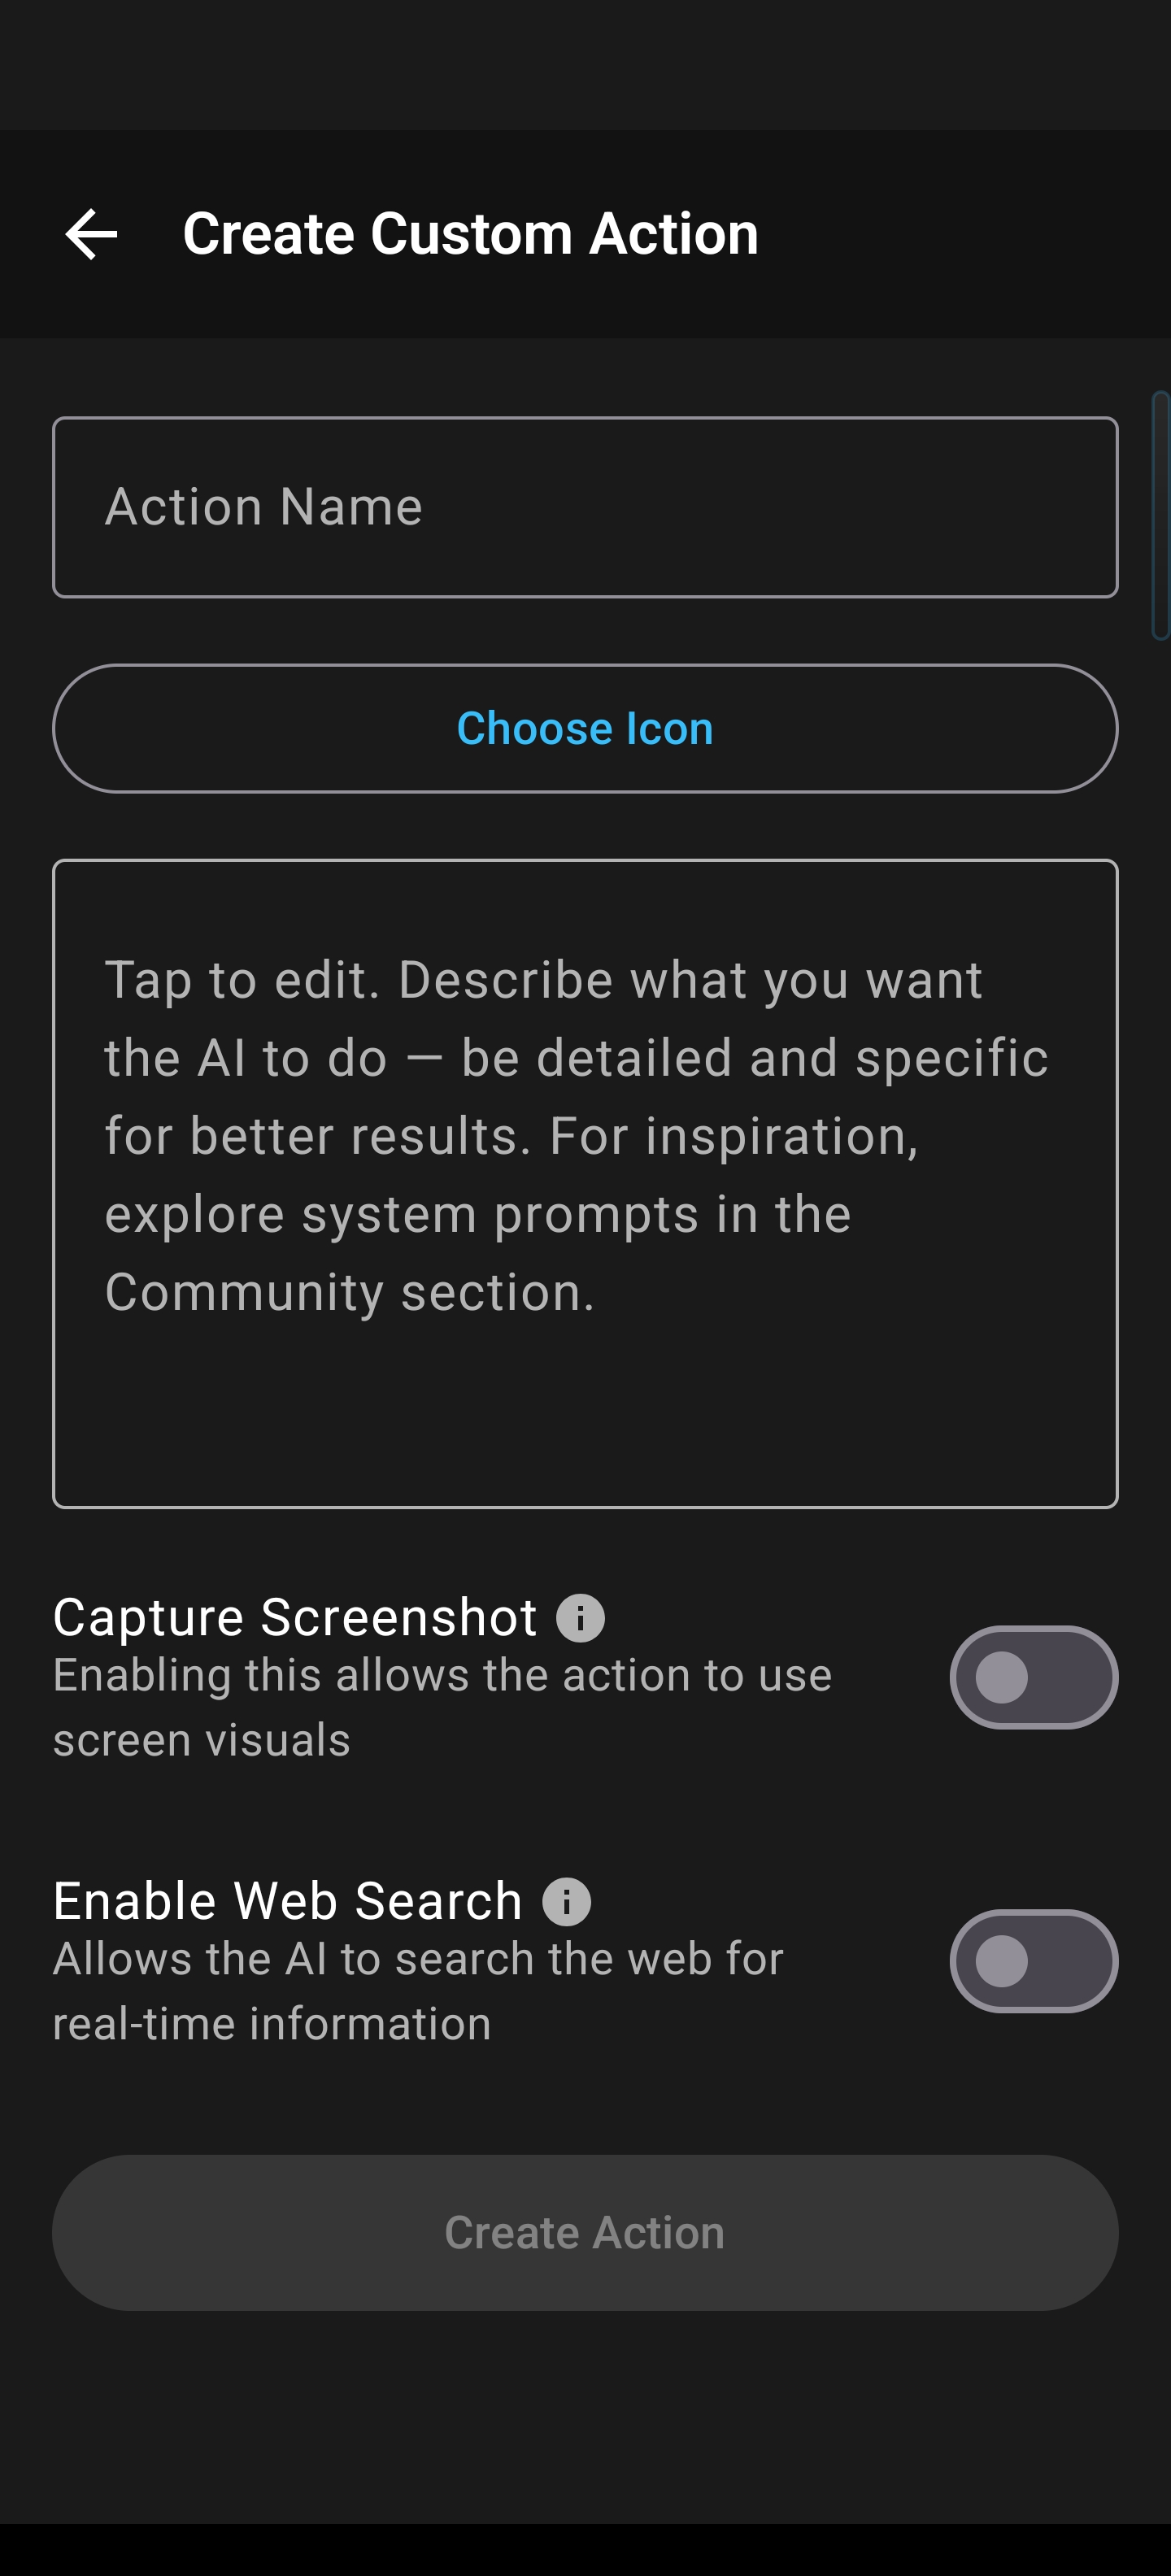
Open Arc and tap the Custom Actions tab in the bottom navigation. Tap the ”+” button to create a new action. You’ll fill out a form with an action name (for example, “Translate to Spanish”), an icon, and your prompt — the instructions that tell the AI what to do with the selected content. You can optionally enable screenshot capture (useful for charts, diagrams, or images) and web search (for real-time information like fact-checking). When you tap Save, the action is created and appears in your sidebar right away.
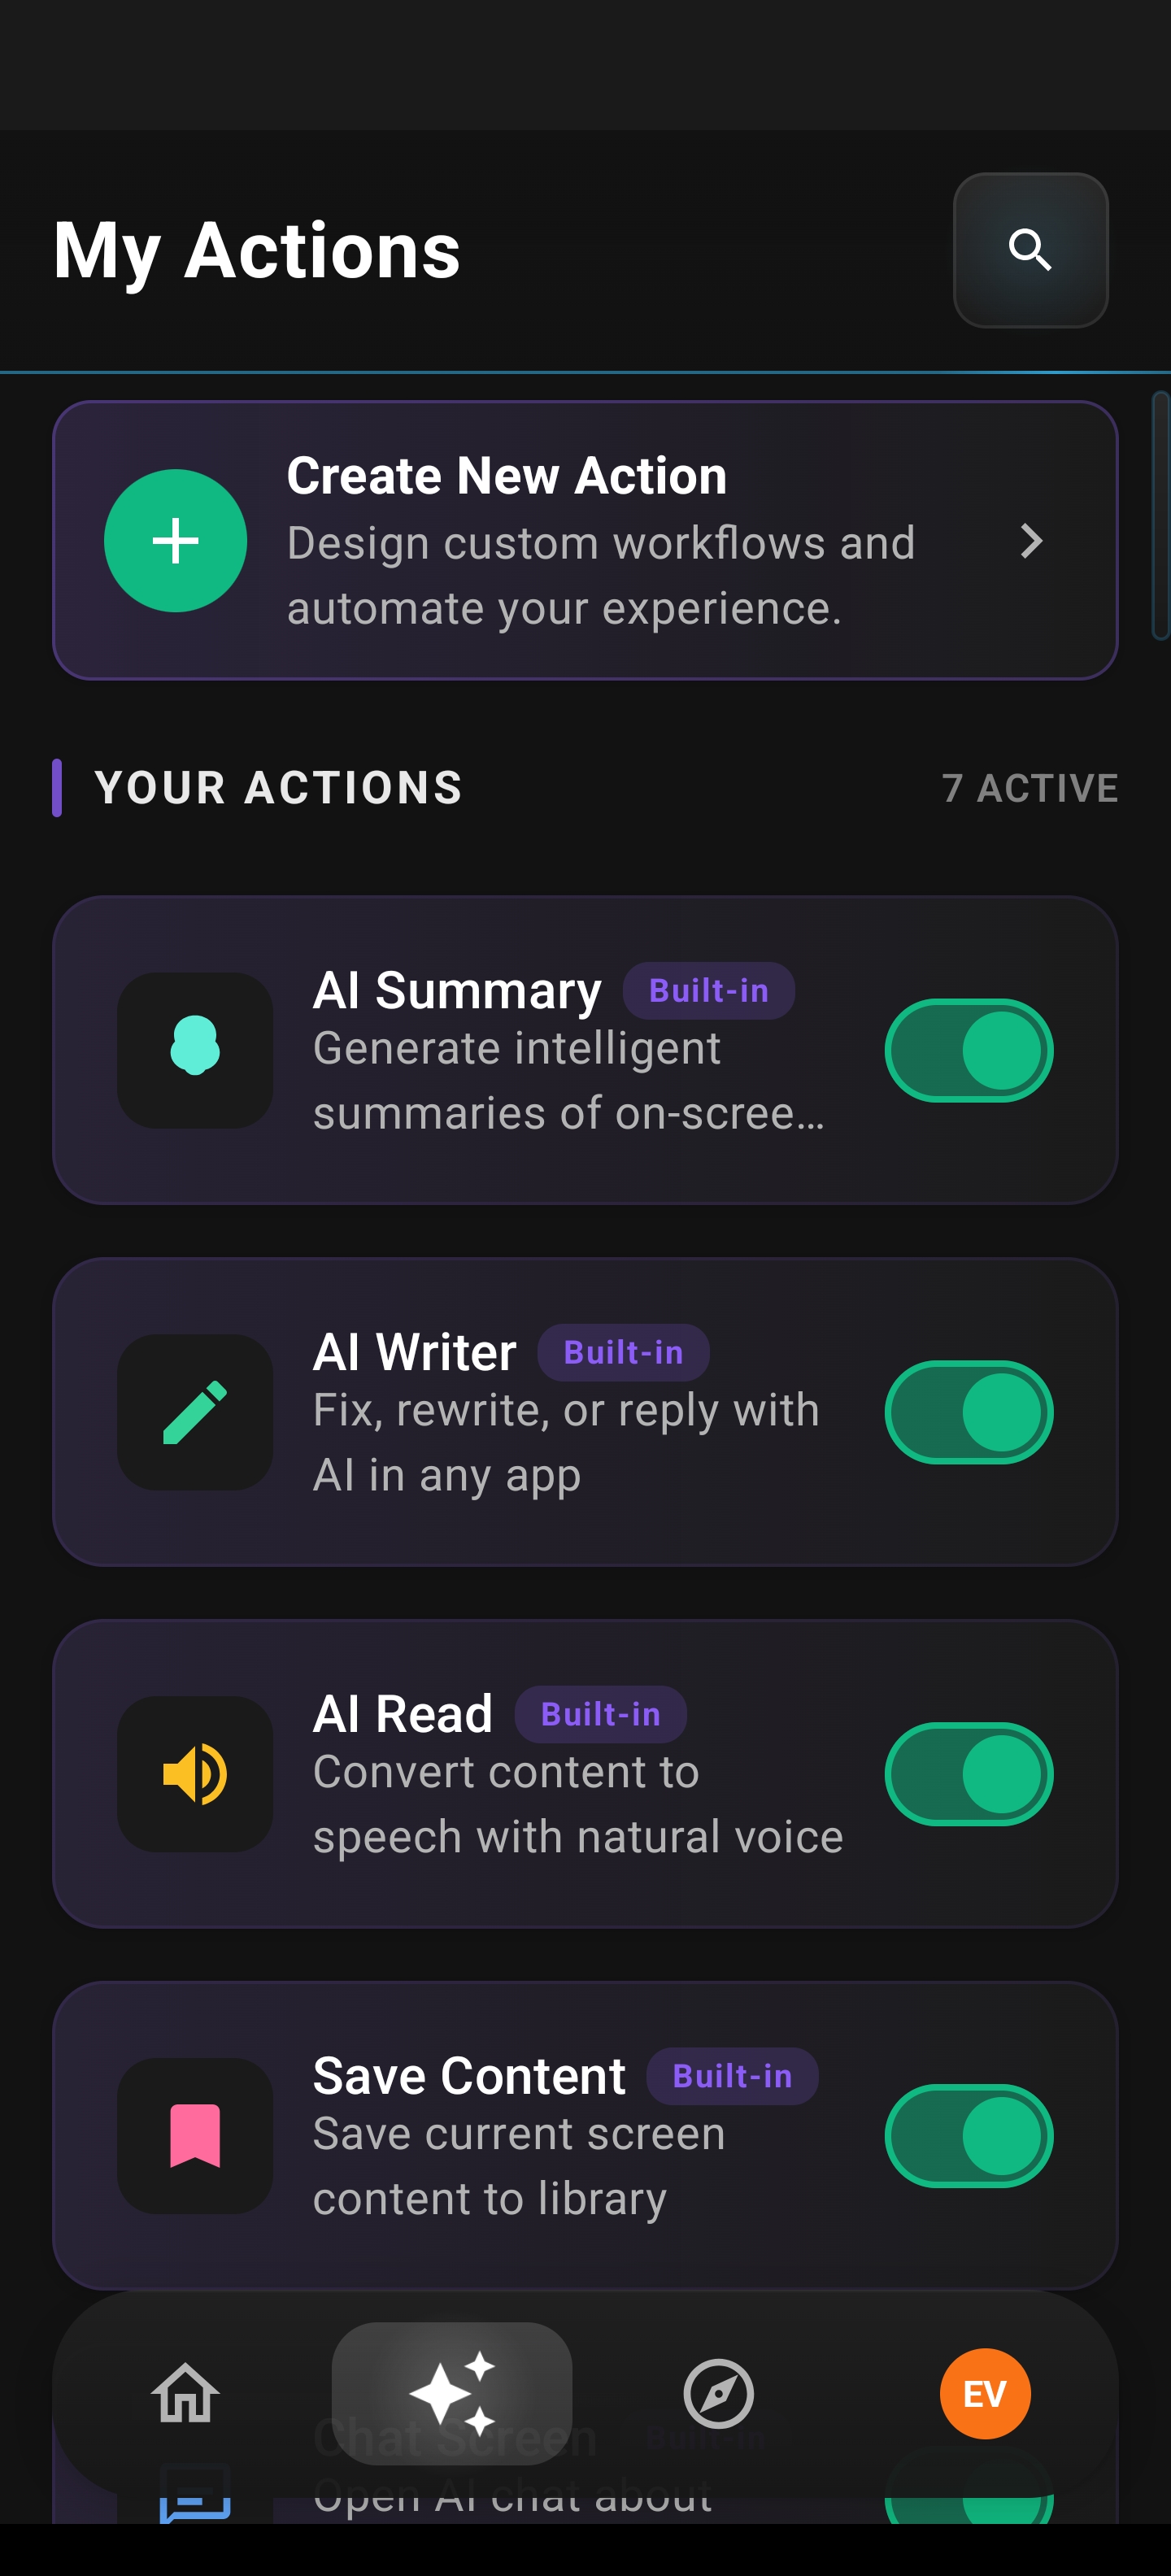
My Actions: create new actions, see how many are active, and toggle built-in actions on or off for the sidebar.
Example: Translation Action
- Name: “Translate to Spanish”
- Icon: Globe
- Prompt: “Translate the following text to Spanish. Maintain the original meaning and tone.”
- Screenshot: OFF
- Web Search: OFF
Example: Fact Checker
- Name: “Verify Facts”
- Icon: Checkmark
- Prompt: “Analyze the following text and verify the factual claims. Identify any false or misleading information. Provide sources for verification.”
- Screenshot: OFF
- Web Search: ON (needs real-time fact-checking)
Example: Study Notes Generator
- Name: “Create Study Notes”
- Icon: Notebook
- Prompt: “Create comprehensive study notes from this content. Include: key concepts, definitions, important facts, and potential exam questions.”
- Screenshot: ON (might include diagrams/charts)
- Web Search: OFF
When you tap the info icon next to the screenshot toggle, a dialog explains that enabling it sends a screenshot along with the text to the AI, which helps when analyzing images, charts, or visual layouts.
Create Custom Action: name, icon, long-form prompt, and optional screenshot / web search toggles before Create Action.
Choosing an Icon
Tap the icon selector in the action form to open the icon picker. You can browse by category (Communication, Translation, Document, Education, Business, Creative, Tech, General), use the search bar to find icons by keyword (e.g., “translate,” “book,” “check”), or scroll through the full grid. Tap an icon to select it; the picker closes and your choice appears in the form. Icons help you quickly identify actions in the sidebar.
Enabling and Disabling Actions
Each action in your list has a toggle switch. When the toggle is ON, the action appears in your floating sidebar. When it’s OFF, the action stays in your list but is hidden from the sidebar. You can disable seasonal or rarely-used actions without deleting them, and re-enable them anytime. The toggle state is saved and persists across app restarts.
Reordering Actions
Long-press any action card to enter reorder mode. Drag handles appear on each card. Touch and hold the handle, then drag the card up or down to change its position. Other cards shift as you move. When you’re done, tap the checkmark to save; the sidebar updates immediately with the new order. Tap the X button to cancel and restore the original order. Reordering works with TalkBack and provides clear feedback when you move actions.
Searching Actions
If you have many actions, tap the search icon at the top of the Custom Actions list. Type a keyword (e.g., “translate,” “summary,” “email”) and the list filters in real time. Search matches both action names and prompt text. A count shows how many actions match. Clear the search to see the full list again.
Editing an Action
Tap any action card to open the edit screen. You can change the name, icon, prompt, or toggles for screenshot and web search. Tap Save to apply changes; the sidebar updates right away if the action is enabled. To delete an action, tap the Delete button at the bottom. A confirmation dialog appears; if you confirm, the action is removed from your list and sidebar immediately.
Running an Action from the Sidebar
When you’re on any screen with content (article, email, social post, etc.), expand the Arc floating sidebar. Your enabled custom actions appear in a grid below the core actions. Tap a custom action (e.g., “Translate to Spanish”) to run it. Arc captures the screen content and sends it to the AI with your prompt. A processing indicator shows while the AI works. When it’s done, the result screen opens with the result, plus buttons to copy, share, ask questions (open chat with the result as context), or regenerate.
Example: “Translate to Spanish”
- Screen content: “Hello, how are you today? I hope you’re having a great day!”
- Result: “¡Hola! ¿Cómo estás hoy? ¡Espero que estés teniendo un gran día!”
Example: “Explain Like I’m 5”
- Screen content: “Quantum entanglement is a phenomenon where particles become correlated in such a way that the quantum state of each particle…”
- Result: “Imagine you have two magic coins. When you flip one coin and it lands on heads, the other coin - no matter how far away - will always land on tails! That’s like quantum entanglement - two tiny particles that are connected in a special way.”
Using Screenshots with Actions
If you enabled screenshot capture for an action, the first time you run it you’ll see a brief info dialog explaining that a screenshot will be sent for visual analysis and that screenshots are processed privately. After you tap “Got it,” Arc captures content and either shows a region selection overlay (if enabled) or captures the full screen. The AI receives both text and the screenshot, so it can analyze images, charts, designs, and layouts. Use cases include chart analysis, design feedback, OCR, and explaining diagrams.
Using Web Search with Actions
Actions with web search enabled can pull in real-time information. When you run one (e.g., “Verify Facts”), Arc captures the content and the AI searches the web, cross-references sources, and generates a result with citations. The result screen shows source links you can tap to open in browser. This is ideal for fact-checking, verification, and anything that needs up-to-date information.
Example: Fact-Checking Action
- Screen content: “The Eiffel Tower was completed in 1889 and is 324 meters tall.”
- Custom prompt: “Verify the factual accuracy of any claims in this text. Provide sources.”
- Result: Fact check with source citations confirming each claim and links to sources.
Selecting a Screenshot Region
When you run an action with screenshot and region selection enabled, a region selection overlay appears after text is captured. A draggable rectangle lets you choose the area to capture. Use the corner handles to resize or drag the rectangle to move it. You can tap “Use Full Screen” to capture everything, or “Capture Selected Region” to capture only the rectangle. An optional “Remember this choice” dialog lets you save your preference for future runs. This is useful when you want to capture only a specific chart, paragraph, or image.
Publishing to Community
When you have an action you want to share, long-press or tap the menu on the action card and choose “Publish to Community.” A dialog explains that your action will be reviewed before appearing in Community Actions, and that a copy will be created while your local action stays unchanged. You can sign in with Google if needed. After you tap Publish, the action is submitted for review. Once approved, it appears in Community Actions with a “Published” badge on your copy. You can unpublish anytime. Your local and published versions are independent — editing your local action does not update the published one.
Unpublishing an Action
If you have a published action and want to remove it from the community, long-press or tap the menu on the action card and choose “Unpublish from Community.” Confirm in the dialog. The published copy is removed from Community Actions, but your local action remains. Other users who added it keep their copies. You can publish again later if you want.
Tips
- Use the “View Prompt” idea from Community Actions: when creating custom actions, write clear, specific prompts so the AI knows exactly what you want.
- Enable screenshot capture for actions that involve charts, diagrams, or images — the AI can analyze both text and visuals.
- Enable web search for fact-checking, verification, or anything that needs current information.
- Use region selection when you only want to capture part of the screen — it reduces AI processing of irrelevant content.
- Reorder your most-used actions to the top of the sidebar for quick access.
- Use search when you have many actions to find the one you need quickly.
Related Features
- Community Actions — Browse and add actions from others, or publish your own
- Floating Sidebar — Where your custom actions appear and run
- Chat with AI — Discuss results from any action
- My Info Vault — Custom actions can reference vault data